

How To Install Ssl Certificate In Unifi Controller
This article describes how to install an issued SSL certificate on Ubiquiti Unifi server. The methods are grouped by the preferred 1 for each arrangement (though each method can technically be used for each arrangement with some modifications).
- General installation method with ace.jar tool
- SSL Installation options for UniFi on Windows
- SSL Installation options for UniFi on Linux/MacOS
- SSL import using keytool
- Import with PKCS7 file
- Import with PEM files
- SSL import using PFX file
- Additional SSL features and tips
Please keep in mind: When installing SSL on Unifi CloudKey, a default SSL (server document) might be used instead of the custom i. This may crusade some security warnings as a result. Here's a resolution steps for such cases:
- Connect to UniFi CloudKey.
- Stop Controller using the below command:
service unifi end - Clear out the symbolic link to the default SSL file and copy the custom SSL file using the following command:
rm /usr/lib/unifi/data/keystore && cp /etc/ssl/individual/unifi.keystore.jks /usr/lib/unifi/information/keystore - Remove (or annotate out) the below line in the
/etc/default/unifibinder:
UNIFI_SSL_KEYSTORE=/etc/ssl/private/unifi.keystore.jks - Restart the Controller using this command:
service unifi start - Then just go on with the certificate installation using the corresponding method below.
General installation method with ace.jar tool
This is the only method described in the official documentation for UniFi. The process itself is relatively simple — just add together the SSL files to the keystore created along with the CSR code by following these steps:
Step i. First, connect to the server where the controller is installed with the help of the appropriate control prompt:
-
- For Linux-based servers, multiple command prompt (SSH) applications be. The most common i is Putty. There are versions of Putty for each server type, including Linux servers and Windows servers, as well every bit the multiple analogues for Android.
- For MacOS, use the Terminal application.
- For Windows servers, you lot tin connect via remote desktop and use either cmd or PowerShell .
Important: It is necessary to run all further commands with administrator rights on Windows, or have root or sudo user access on Linux/MacOS.
To run commands with administrator rights on a Windows server, you can right-click the program icon and choose the Run equally administrator option, or click Properties -> Compatibility -> Marking the option ' Run this program equally an administrator' -> confirm ( OK) .
To ready the required access on Linux-based systems, run sudo su – or just start each command with sudo .
Footstep 2. Upload the PEM certificate (the .crt file you lot received from the Certificate Authority), root certificate, and the 2 intermediate certificates from the downloaded annal on your server. if yous received a combined .ca-bundle file instead of carve up intermediate and root files, you can open the file with whatever text editor and save the codes from inside information technology as separate files.
For any Domain Validation type SSL (like PositiveSSL), the command will look like this:
- for Linux/Mac OS:java -jar /*UniFi root*/lib/ace.jar import_cert /*Some path*/example.crt /*Some path*/SectigoRSADomainValidationSecureServerCA.crt /*Some path*/USERTrustRSAAddTrustCA.crt /*Some path*/addtrustexternalcaroot.crt
- for Windows: coffee -jar "*UniFi root*\lib\ace.jar import_cert "*Some path*\instance.crt" "*Some path*\SectigoRSADomainValidationSecureServerCA.crt" "*Some path*\USERTrustRSAAddTrustCA.crt" "*Some path*\addtrustexternalcaroot.crt"
Note: Replace 'example.crt' and 'Some path…' with your actual SSL file name and paths to each file. Adjacent, you will need to type in the keystore password (this is aircontrolenterprise, unless information technology was changed in your UniFi settings) and ostend the certificate'south import.
Of import: The root binder name depends on the system UniFi controller is installed on:
- /usr/lib/unifi/ – for UniFi Cloud Fundamental, Ubuntu, and other Debian-based Linux distributions;
- /opt/unifi/ – for CentOS, RedHat, Fedora, and other RHEL Linux distributions;
- ~/Library/Awarding Back up/UniFi – for Mac Os;
- "%USERPROFILE%/Ubiquiti Unifi"
or (which is the same)
"C:\Users\*account username*\Ubiquiti UniFi" – for Windows.
Alternatively, you lot tin can open the UniFi root folder beginning using the control cd *Unifi root* , movement all the files in that location, and then run the installation command in it. Past doing information technology this way you won't need to specify the full paths in the control itself.
Step 3. Restart the UniFi controller for the changes to apply:
-
- On Linux/MacOS, this is: service unifi restart .
- On Windows, only close the UniFi application and offset it again by clicking on the respective icon.
The restart process may take a bit of time depending on your machine and the number of applications running.
And now you're done!
Important: Some versions of UniFi may show the error, "Unable to import the certificate into keystore". This is related to the ace.jar inability to parse the new line symbols (\n and \r) on these item versions of UniFi.
On Linux and MacOS, you can set this past simply removing these symbols from each file using the command:
tr -d '\n\r' < * your file proper noun* | echo $(cat -) > *your file name*
Employ the name of certificate, intermediate certificate, or root file instead of *your file name*. Utilise the command to each file.
On Windows, the document files can be fixed using Notepad++:
-
- Open the file with Notepad++.
- Click ctrl+F and go to the Replace tab.
- Click the Extended option to replace the required symbols.

- Type \n in the "Observe what" box and click Replace All.
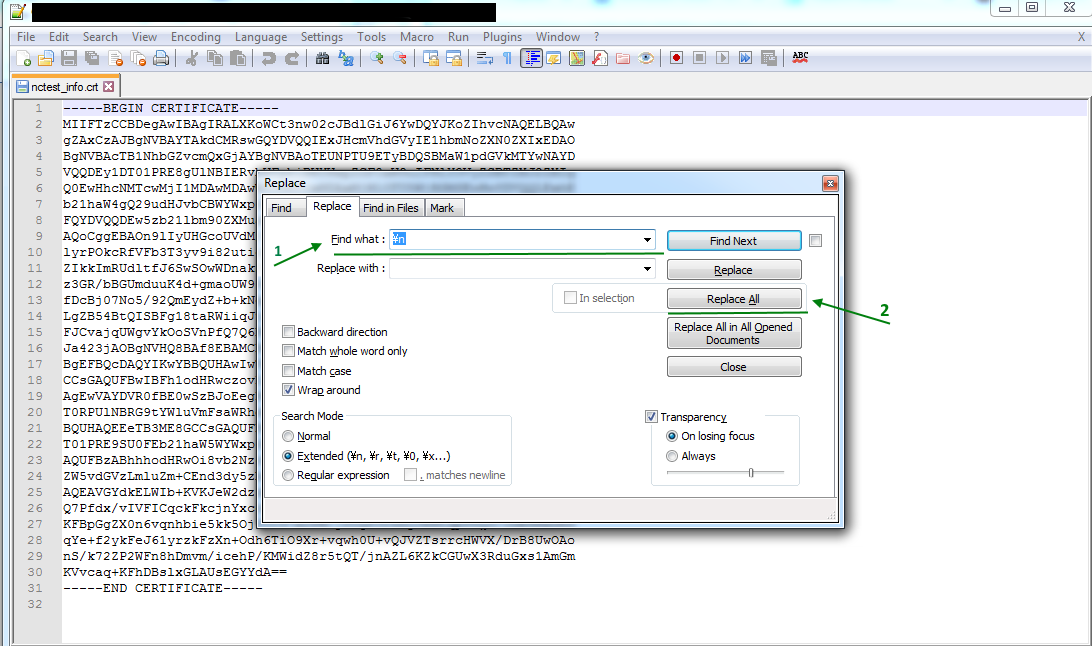
- Repeat this process using the value \r.
- Salvage the file.
SSL Installation options for UniFi on Windows (Keystore Explorer)
The easiest manner to install an SSL on UniFi on Windows is to employ the "Keystore Explorer". The procedure is unproblematic:
- For SSL activation cull the option "Auto-activate" as you will create a new keystore anyway.
- Open up the electric current UniFi keystore file in Keystore Explorer using the default password aircontrolenterprise or the one set* for the controller.* Notation : The password can be ready in the file organization.properties in /*UniFi root*/data/ with the following parameter: app.keystore.pass=*password*
- Create the PFX file from the saved Individual key file and SSL files. To do this, use this online converter or another like tool. Alternatively, you can practice the post-obit:Put both the certificate and the Private cardinal files in one folder using the same file names and correct extensions.For example, example_com.p7b, example_com.cardinal.Use the following command in cmd or PowerShell to generate the PFX file: certutil -mergepfx example_com.p7b example_com.pfx Note: There is no need to mention the key file as information technology is fetched by default if the key and the certificate files have the same names and respective extensions. You will exist asked to enter the new password. Ready whatever password for this.Warning: the certutil control may fail sometimes because of how the files are formatted. If this happens, endeavor using another method.If you have OpenSSL installed, you lot can do it the same way:
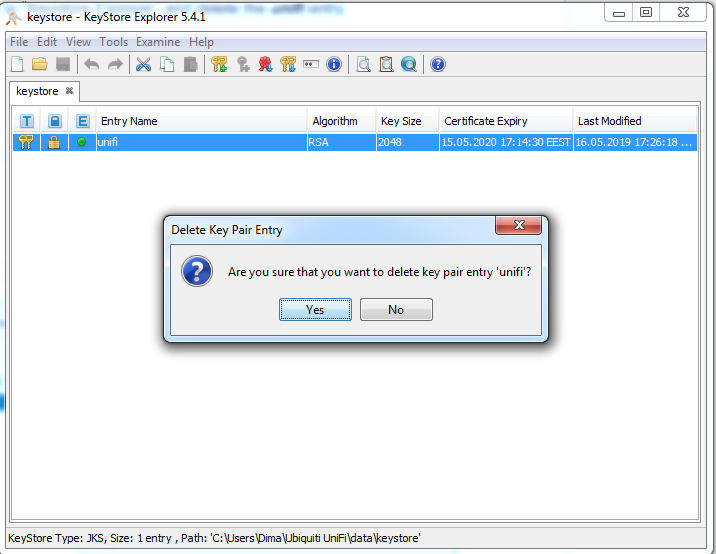
"*OpenSSL path*" pkcs12 -export -out "*Some path*\example.pfx" -inkey "*Some path*\example.key" -in "*Some path*\example.p7b" -name "unifi" - Go dorsum to Keystore Explorer and delete the unifi entry from your keystore.
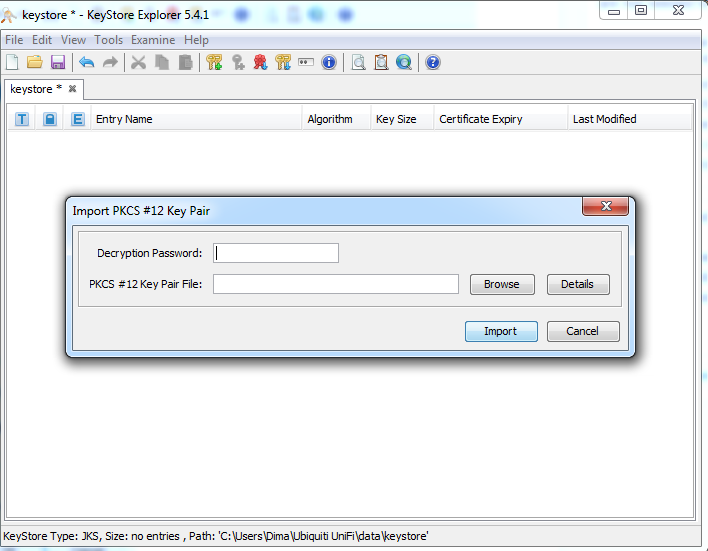
- Choose the option: Tools -> Import Key Pair -> PKCS12.Locate your PFX file ( example_com.pfx ) and import it. Use the aforementioned password you gear up during the PFX creation (step 3).
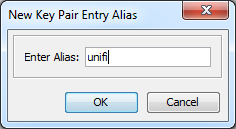
- For the Fundamental Pair Entry Alias, utilize unifi .
- Provide the new password. For this, utilize your default keystore password (this is always aircontrolenterprise , unless you changed information technology in system.backdrop).
- Save the modified keystore file with File -> Salve (or simply click on the Salve icon).
- Close the UniFi awarding and start it again with the corresponding icon to apply changes.Warning: Sometimes, the keystore may get corrupted due to multiple imports. The solution is to delete the initial keystore and restart UniFi to create a new one. You volition be able to do the setup after this.
Note: This tool is as well available for Linux/MacOS. However, both systems also take ready-to-use control line options for the procedure.
SSL Installation options for UniFi on Linux/MacOS
SSL Import using Keytool
This option is quite simple. It doesn't have parsing issues, and allows for some flexibility. The procedure itself is similar to the document installation on Coffee-based servers like Tomcat.
Importing PKCS7 file
The most convenient pick is to import the file in PKCS#seven format (.p7b or .cer extension) inside the UniFi keystore.
Steps 1-two are every bit higher up.
The Individual key for the document should exist saved in the default UniFi keystore in the file /*UniFi root*/information/keystore after the CSR generation.
3. Upload the certificate file in PKCS#7 format from the received archive on your server.
4. Use the following command to import this file into the keystore:
keytool -import -trustcacerts -alias unifi -file /*Some path*/exmple.p7b -keystore *Unifi root*/data/keystore
Enter the keystore password aircontrolenterprise (unless it was changed in your UniFi settings) and press Enter to consummate the import.
v. Restart the UniFi controller to apply the changes:
service unifi restart
Alternatively, y'all tin open the UniFi root folder commencement using the command cd *Unifi root* . Put all the files in the folder and then run the installation control in it. This way you won't need to specify the total paths in the command itself.
Warning: You may go the error "Input non an X.509 document" during the document import. It may exist related to the extra empty lines in the file or another formatting issue. If editing the file in a text editor doesn't help, the best solution is to import the certificate as split up PEM files equally described in the next section.
Import with PEM files
If importing the PKCS#vii file results in an fault, you can apply PEM files (.crt) instead. The following are commands for any Domain Validation SSL type (similar PositiveSSL):
- Import the root certificate first: keytool -import -trustcacerts -alias root -file /*Some path*/addtrustexternalcaroot.crt -keystore /data/keystore
- Import intermediate certificates one by ane, using a separate alias for each: keytool -import -trustcacerts -alias intermediate2 -file /*Some path*/USERTrustRSAAddTrustCA.crt -keystore /data/keystore and keytool -import -trustcacerts -alias intermediate1 -file /*Some path*/SectigoRSADomainValidationSecureServerCA.crt -keystore /data/keystore
- Import your document file using the alias unifi : keytool -import -trustcacerts -alias unifi -file /*Some path*/example.crt -keystore /data/keystore Note: Yous will demand to enter the keystore password after running each command and press Enter to complete the import.Tip: To avert entering the password multiple times, add the statement -storepass *password* at the end of each control. Use your bodily password for the UniFi keystore.
- Restart the UniFi controller to apply the changes: service unifi restart
The files are the aforementioned as for the installation method using ace.jar.
Note: The aforementioned method can be used on Windows and the process is very like. However, information technology should be noted that Windows requires you to utilise the full path to the keystore awarding and each file is imported in Windows format.
Import in PKCS#7 will look like this, for example:
"*Java base of operations binder*\bin\keytool.exe" -import -trustcacerts -allonym unifi -file "*some3 path*\example.p7b" -keystore "C:\Users\*account username*\Ubiquiti UniFi\data\keystore"
SSL import using PFX file
This choice should exist used if the Certificate Signing Request (CSR) was generated elsewhere, or if you lot used the "Machine-activate" selection during the SSL activation. In this example, a Private primal (.key or _key.txt) is provided to yous during the process.
You lot will need to create one PFX file from this key and the SSL files to use later in the procedure.
Steps 1-2 are described above.
If you prefer doing this procedure using the command line , the next steps volition be:
- Upload your certificate file (.crt), and chain file (.ca-bundle) or a PKCS#7 file (.p7b/.cer) on the server. Motion or upload the previously created Private key file to the same folder for your convenience.
Note: Technically, information technology is possible to take the files in different folders likewise; still, this volition make the process more complicated.
- Create the PKCS#12 (PFX) file with this like OpenSSL command:
openssl pkcs12 -consign -out /*Some path*/example.pfx -inkey /*Some path*/case.key -in /*Some path*/example.crt -certfile /*Some path*/example.ca-parcel -proper name "unifi"
Or openssl pkcs12 -export -out /*Some path*/example.pfx -inkey /*Some path*/example.fundamental -in /*Some path*/example.p7b -name "unifi"
- Add the created PFX file into the keystore:
keytool -importkeystore -srckeystore /*Some path*/instance.pfx -srcstoretype PKCS12 -destkeystore *UniFi root*/data/keystore -deststoretype jks -deststorepass *password*
Utilise your actual UniFi *countersign*.
- Restart the UniFi controller to apply the changes:
service unifi restart
If you prefer generating the PFX elsewhere (for example, with this online tool), your next steps volition exist:
- Generate the PKCS#12 (PFX) file using a suitable dissever tool.
- Upload the PFX file on the same server where UniFi controller is installed.
- Import the created PFX file into the keystore:
keytool -importkeystore -srckeystore /*Some path*/instance.pfx -srcstoretype pkcs12 -srcalias ane -destkeystore /*UniFi root*/information/keystore -deststoretype jks -destalias unifi -deststorepass *password*
Note: For the PFX file generated elsewhere 1 is used as the default alias. Delight specify the -srcalias and -destalias to avert the error, "Alias unifi does not exist". Apply your bodily UniFi *password*.
Sometimes the default allonym is different. In such a case y'all tin can check the alias with any of the following commands:
openssl pkcs12 -in example.pfx -info
keytool -list -storetype pkcs12 -keystore *instance.pfx -v
- Restart the UniFi controller to apply the changes:
service unifi restart
Note: The aforementioned process can be done on Windows. For details on how to create the PFX file check the recommended installation method for Windows.
The import itself tin be done with a like command:
"*Coffee root*\bin\keytool.exe" -importkeystore -srckeystore "*Some path*\example.pfx" -srcstoretype pkcs12 -srcalias 1 -destkeystore "C:\Users\*account username*\Ubiquiti UniFi\data\keystore" -deststoretype jks -destalias unifi -deststorepass *password*
*Java root* is specified during the Java installation on your server. By default, it looks like "C:\Plan Files\Coffee\*Coffee version*\".
Additional SSL features and tips
Points to consider when setting up an SSL on UniFi:
- It is not possible to use the ECC certificates on UniFi. The organization will allow yous to import this kind of file, but the SSL will non work.
- Server Name Indication (SNI) is also not supported. So, only one keystore with a certificate can be present on the server at the same time.
Additional SSL-related features immune on UniFi:
- All versions of UniFi version from 4.x onward automatically enables HTTPS redirect in one case an SSL is fix up. If you enter the default UniFi admin link (past default, https://*UniFi domain name*:8080 in system.properties) then, if the SSL is already installed, you'll exist forwarded to the https:// link (by default, https://*UniFi domain name*:8443).This option works on all UniFi versions starting from iv.x.
- HSTS can be also enabled on UniFi in the system.properties by uncommenting and modifying these lines:unifi.https.hsts=false – use truthful to enable HSTS.unifi.https.hsts.max_age=*value* – this specifies how long HSTS is buried for (in seconds).unifi.https.hsts.preload=false – ready this to true to add your "UniFi domain name" to the preload list. The HSTs will work until you request its removal from the list.unifi.https.hsts.subdomain=simulated – set this to true if you would like to as well utilize HSTS policy for subdomains of your domain proper name, and not only for the primary domain proper noun. Mostly, this choice is not required as UniFi admin normally uses only 1 hostname.
- Yous can limit zero suites and SSL/TLS versions used on UniFi in the organisation.properties past uncommenting and modifying these lines:unifi.https.ciphers=c1, c2, etc. – replace the values c1, c2, etc. with the actual names of the ciphers you want to;useunifi.https.sslEnabledProtocols=p1, p2, etc. – supplant the values p1, p2, etc. with the actual names of the protocols yous want to use. Notation : The recommended and lite (supports outdated browsers) configurations for UniFi can be checked here .

Source: https://www.ssls.com/knowledgebase/installing-an-ssl-certificate-on-ubiquiti-unifi/
Posted by: stanglalifuld.blogspot.com
0 Response to "How To Install Ssl Certificate In Unifi Controller"
Post a Comment